
VirtualBox là một ứng dụng cho phép ảo hóa. Điều này có nghĩa là nó có thể cài đặt trên các máy tính dựa trên AMD hoặc ngay cả Intel hiện tại của bạn, bất kể máy tính của bạn đang chạy hệ điều hành Linux, Windows, Solaris hay Mac. VirtualBox có thể giúp mở rộng các khả năng hiện có của máy tính của bạn sao cho nó có thể chạy nhiều hệ điều hành (trong các máy ảo khác nhau) đồng thời. Bài viết dưới đây sẽ hướng dẫn bạn cài đặt VirtualBox trên Centos 8.
Hướng dẫn cài đặt
Bước 1: Cài đặt các gói cần thiết và khởi động lại máy tính.
# install from EPEL
[root@viettelco ~]#
dnf –enablerepo=epel -y install gcc make glibc kernel-headers kernel-devel dkms
[root@viettelco ~]#
dnf -y upgrade kernel
[root@viettelco ~]#
reboot
Bước 2: Cài đặt VirtualBox
[root@viettelco ~]#
curl http://download.virtualbox.org/virtualbox/rpm/rhel/virtualbox.repo -o /etc/yum.repos.d/virtualbox.repo
[root@viettelco ~]#
dnf search virtualbox
Oracle Linux / RHEL / CentOS-8 / x86_64 – Virtu 1.9 kB/s | 181 B 00:00
Oracle Linux / RHEL / CentOS-8 / x86_64 – Virtu 851 B/s | 1.7 kB 00:02
Oracle Linux / RHEL / CentOS-8 / x86_64 – Virtu 87 kB/s | 28 kB 00:00
====================== Summary & Name Matched: virtualbox ======================
VirtualBox-5.2.x86_64 : Oracle VM VirtualBox
VirtualBox-6.0.x86_64 : Oracle VM VirtualBox
VirtualBox-6.1.x86_64 : Oracle VM VirtualBox
[root@viettelco ~]#
dnf -y install VirtualBox-6.1[root@viettelco ~]#
VBoxManage -v
6.1.0r135406
Bước 3: Cài đặt gói mở rộng để sử dụng VRDP (Giao thức máy tính từ xa ảo).
[root@viettelco ~]#
curl -O http://download.virtualbox.org/virtualbox/6.1.0/Oracle_VM_VirtualBox_Extension_Pack-6.1.0.vbox-extpack
[root@viettelco ~]#
VBoxManage extpack install Oracle_VM_VirtualBox_Extension_Pack-6.1.0.vbox-extpack
…..
…..
# agree to the license terms
Do you agree to these license terms and conditions (y/n)? y
License accepted. For batch installation add
–accept-license=56be48f923303c8cababb0bb4c478284b688ed23f16d775d729b89a2e8e5f9eb
to the VBoxManage command line.
0%…10%…20%…30%…40%…50%…60%…70%…80%…90%…100%
Successfully installed “Oracle VM VirtualBox Extension Pack”.
[root@viettelco ~]#
VBoxManage list extpacks
Extension Packs: 1
Pack no. 0: Oracle VM VirtualBox Extension Pack
Version: 6.1.0
Revision: 135406
Edition:
Description: Oracle Cloud Infrastructure integration, USB 2.0 and USB 3.0 Host Controller, Host Webcam, VirtualBox RDP, PXE ROM, Disk Encryption, NVMe.
VRDE Module: VBoxVRDP
Usable: true
Why unusable:
Bước 4: Tạo máy ảo thử nghiệm. Trong ví dụ này, tạo VM để cài đặt CentOS 8
Tạo một máy ảo
# create a directory for VM
[root@viettelco ~]#
mkdir /var/vbox
# create a VM
[root@viettelco ~]#
VBoxManage createvm \
–name CentOS_8 \
–ostype RedHat_64 \
–register \
–basefolder /var/vbox
Virtual machine ‘CentOS_8’ is created and registered.
UUID: 0f0cd83e-ce0d-4445-904e-70ece8dbdf5a
Settings file: ‘/var/vbox/CentOS_8/CentOS_8.vbox’
# modify settings for VM
# replace interface name [enp1s0] to your own environment
[root@viettelco ~]#
VBoxManage modifyvm CentOS_8 \
–cpus 4 \
–memory 4096 \
–nic1 bridged \
–bridgeadapter1 enp1s0 \
–boot1 dvd \
–vrde on \
–vrdeport 5001
# configure storage for VM
[root@viettelco ~]#
VBoxManage storagectl CentOS_8 –name “CentOS_8_SATA” –add sata
[root@viettelco ~]#
VBoxManage createhd \
–filename /var/vbox/CentOS_8/CentOS_8.vdi \
–size 20480 \
–format VDI \
–variant Standard
0%…10%…20%…30%…40%…50%…60%…70%…80%…90%…100%
Medium created. UUID: c19f8675-f169-4eea-8776-4e30925c6a35
[root@viettelco ~]#
VBoxManage storageattach CentOS_8 \
–storagectl CentOS_8_SATA \
–port 1 \
–type hdd \
–medium /var/vbox/CentOS_8/CentOS_8.vdi
# configure DVD drive for VM
# example below, it specifies an ISO file for installation
[root@viettelco ~]#
VBoxManage storageattach CentOS_8 \
–storagectl CentOS_8_SATA \
–port 0 \
–type dvddrive \
–medium /tmp/CentOS-8-x86_64-1905-dvd1.iso
# confirm settings for VM
[root@viettelco ~]#
VBoxManage showvminfo CentOS_8
Name: CentOS_8
Groups: /
Guest OS: Red Hat (64-bit)
UUID: 0f0cd83e-ce0d-4445-904e-70ece8dbdf5a
Config file: /var/vbox/CentOS_8/CentOS_8.vbox
Snapshot folder: /var/vbox/CentOS_8/Snapshots
Log folder: /var/vbox/CentOS_8/Logs
Hardware UUID: 0f0cd83e-ce0d-4445-904e-70ece8dbdf5a
Memory size 4096MB
Page Fusion: disabled
VRAM size: 8MB
CPU exec cap: 100%
HPET: disabled
CPUProfile: host
Chipset: piix3
Firmware: BIOS
Number of CPUs: 4
PAE: enabled
Long Mode: enabled
Triple Fault Reset: disabled
APIC: enabled
X2APIC: enabled
Nested VT-x/AMD-V: disabled
…..
…..
# * if dettach DVD, run like follows
[root@viettelco ~]#
VBoxManage storageattach CentOS_8 –storagectl CentOS_8_SATA –port 0 –device 0 –medium none
Khởi động máy ảo
[root@viettelco ~]#
VBoxManage startvm CentOS_8 –type headless
Waiting for VM “CentOS_8” to power on…
VM “CentOS_8” has been successfully started.
Nếu Firewalld đang chạy, cần phải cho phép các cổng bạn đặt cho cổng VRDE hoặc có kế hoạch sử dụng cho cổng đó. (trong ví dụ này, đó là cổng [5001])
[root@viettelco ~]#
firewall-cmd –add-port=5000-5010/tcp –permanent
success
[root@viettelco ~]#
firewall-cmd –reload
success
Khi bật môi trường VRDP, có thể kết nối với RDP.
Ví dụ bên dưới là sử dụng trên Windows 10.
Chạy Remote Desktop Client và chỉ định [(Tên máy chủ hoặc địa chỉ IP của VirtualBox Server) 🙁 vrdeport được đặt cho VM)] để kết nối với VM.
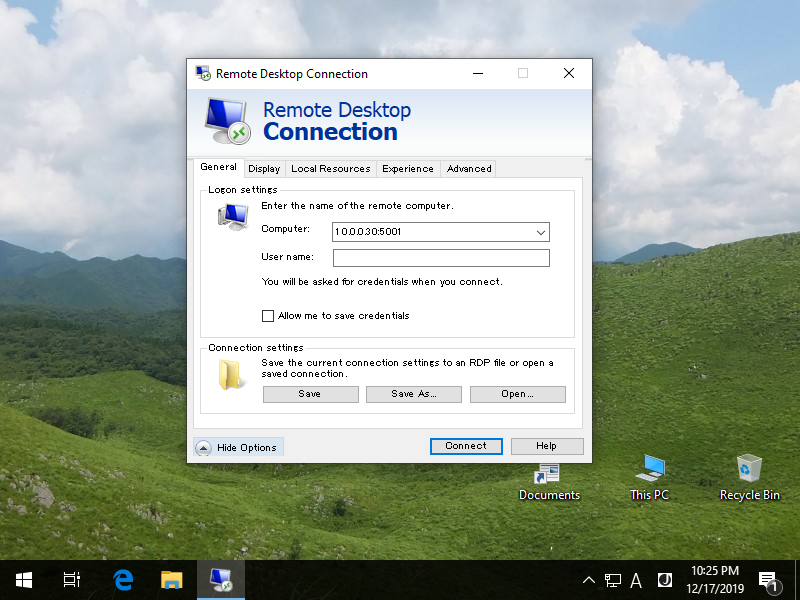
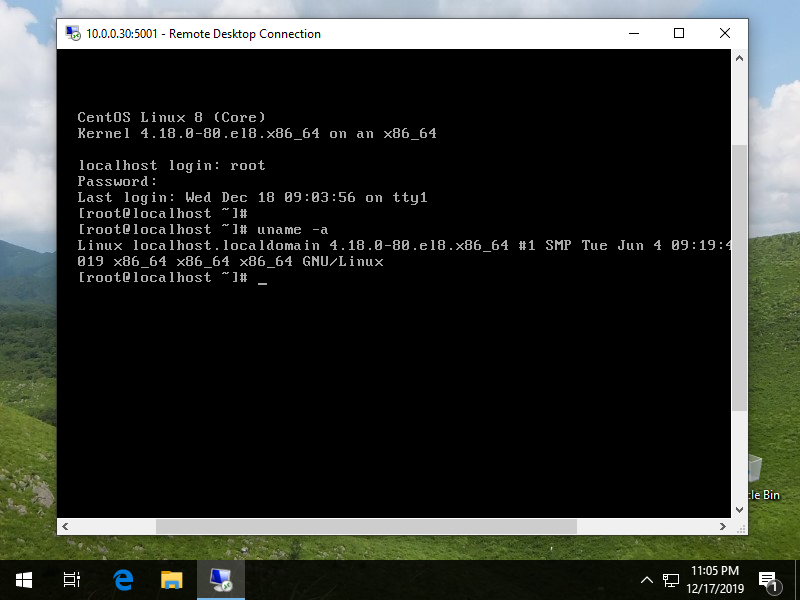
Sau khi kết nối thành công, bảng điều khiển VM được hiển thị
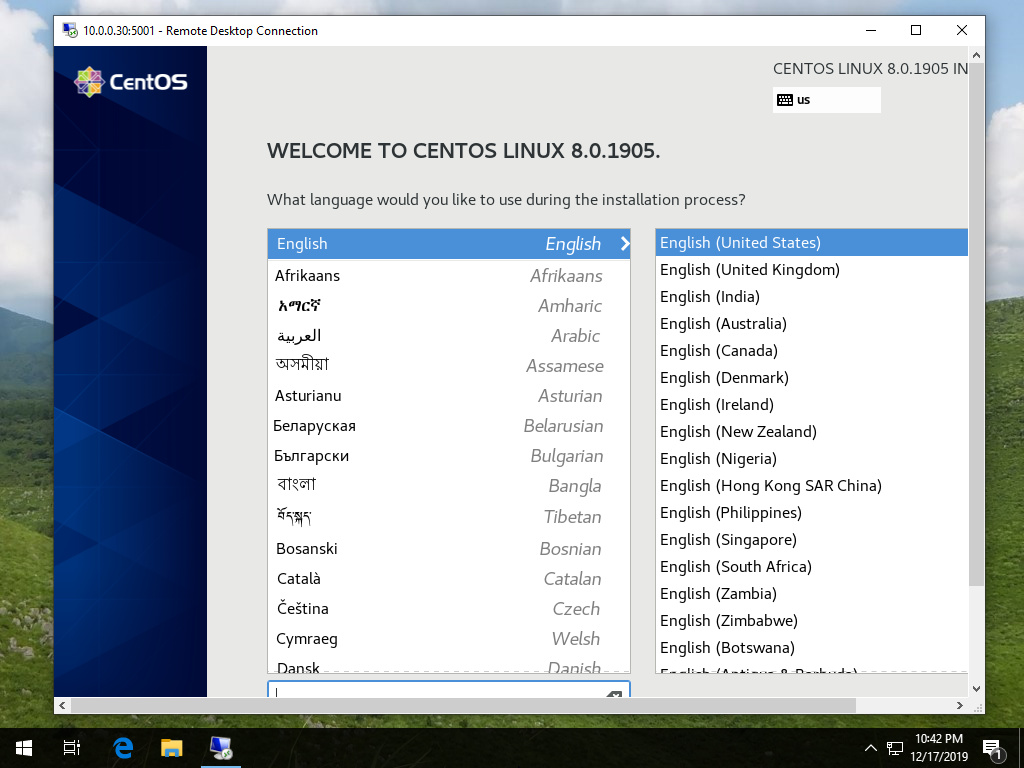
Cài đặt xong và Máy ảo đang chạy bình thường.
Như vậy là Viettelco đã hướng dẫn chi tiết cách cài đặt Oracle VM VirtualBox trên Centos 8, nếu có bất cứ thắc mắc hoặc cần hô trợ bạn có thể liên hệ với ký thuật của Viettelco để được trợ giúp.